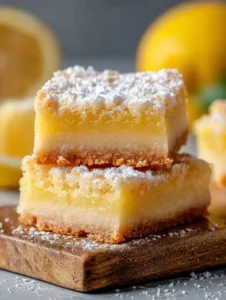

There’s something about lemon bars that feels instantly cheerful. Maybe it’s the sunny yellow filling, the snowy dusting of powdered sugar, or that first bite where sweet, tart, creamy lemon meets a buttery shortbread crust. Whatever it is, lemon bars have a way of standing out on any dessert table. They’re simple enough for everyday baking, but elegant enough for bridal showers, spring brunches, picnics, baby showers, and holiday dessert spreads.
What makes these lemon bars so special is the contrast in texture. The base is a rich, buttery shortbread crust that holds its shape beautifully while staying tender and crisp. On top sits a thick lemon filling that’s silky, vibrant, and just firm enough to slice cleanly when chilled. They’re not too thin, not too gooey, and not too sweet. Instead, they strike that perfect balance of bright citrus flavor and smooth, creamy sweetness.
Another reason these bars are so loved is that they look impressive without being complicated. You only need a few basic ingredients, and the method is very approachable, even for beginner bakers. The result tastes bakery-worthy, but the process feels manageable and satisfying. If you’ve been searching for the best homemade lemon bars recipe, this is the kind of dessert that earns a permanent place in your favorites folder.
table of contents
Full Recipe
Ingredients
For the Shortbread Crust
- 1 cup unsalted butter, melted
- 1/2 cup granulated sugar
- 2 teaspoons vanilla extract
- 1/2 teaspoon salt
- 2 cups + 2 tablespoons all-purpose flour
For the Lemon Filling
- 2 cups granulated sugar
- 6 tablespoons all-purpose flour
- 6 large eggs
- 1 cup fresh lemon juice
- 2 teaspoons fresh lemon zest, optional
Optional for Finishing
- Confectioners’ sugar for dusting
Instructions
Step 1: Prepare the Pan
Preheat your oven to 325°F (163°C). Line a 9×13-inch glass baking pan with parchment paper, leaving enough overhang on the sides to lift the bars out later. This makes removing and slicing them much easier once chilled.
Step 2: Make the Shortbread Crust
In a medium bowl, stir together the melted butter, granulated sugar, vanilla extract, and salt. Add the flour and mix until a thick dough forms. The mixture will seem dense, but that’s exactly what you want for a sturdy, buttery shortbread base.
Step 3: Press and Bake the Crust
Press the dough firmly and evenly into the prepared pan. Try to make the layer as level as possible so it bakes uniformly. Bake for 20 to 22 minutes, or until the edges are lightly golden. Remove the pan from the oven.
Step 4: Poke the Warm Crust
Using a fork, gently poke holes all over the warm crust. Do not poke all the way through. This step helps the lemon filling grip the crust and keeps the layers connected better after baking.
Step 5: Make the Lemon Filling
In a large bowl, sift together the sugar and flour. This helps prevent flour lumps in the filling. Whisk in the eggs, then whisk in the fresh lemon juice and lemon zest if using. Keep whisking until the mixture is smooth and fully combined.
Step 6: Add Filling to the Warm Crust
Pour the lemon filling over the warm crust. This is important because the warm crust helps the filling set and adhere more evenly during baking.
Step 7: Bake the Lemon Bars
Bake for 22 to 26 minutes, or until the center looks relatively set and no longer jiggles when you gently tap the pan. You do not want to overbake them, so start checking early.
Step 8: Cool Completely
Remove the bars from the oven and let them cool completely at room temperature. After about 2 hours, transfer them to the refrigerator for 1 to 2 more hours until thoroughly chilled. Lemon bars slice and taste best when cold.
Step 9: Dust and Slice
Once chilled, lift the bars out of the pan using the parchment overhang. Dust with confectioners’ sugar and cut into squares. For clean cuts, wipe the knife between slices.
Tips & Tricks
The first big secret to great lemon bars is using a glass baking dish instead of metal. Glass bakes more gently and helps prevent the crust and filling from cooking too quickly or browning too much. Because lemon bars are delicate, a slower, steadier bake gives better texture.
Fresh lemon juice makes a huge difference. Bottled lemon juice can work in a pinch, but fresh juice tastes brighter, cleaner, and more vibrant. Since lemon is the star flavor here, using fresh lemons is worth it. If you have the time, zest the lemons before juicing them so you can add a little zest to the filling for even more citrus depth.
Do not skip cooling and chilling. Lemon bars need time to settle into their final texture. If you cut them too soon, the filling may be too soft and the slices less neat. Chilling also intensifies the lemon flavor and makes the bars extra refreshing.
Sifting the sugar and flour together helps keep the filling smooth. Flour can be stubborn in a lemon mixture, and this step reduces the chance of lumps. It may seem small, but it helps create that silky finish people love in a good lemon bar.
Bake at a lower temperature to protect the filling. Lemon bars are not meant to puff dramatically or brown deeply. Lower, gentler baking keeps the texture creamy rather than rubbery.
If you love very neat presentation, chill the bars well before dusting with sugar. Then dust right before serving so the powdered sugar looks fresh and bright.
Variations
One of the easiest ways to change lemon bars is by swapping the citrus. Lime bars are bright and punchy, grapefruit bars feel more grown-up and slightly floral, and blood orange bars create a beautiful color and softer citrus flavor. If you use a sweeter citrus, you can reduce the sugar slightly, but keep enough to preserve the structure of the filling.
You can also add extra zest for a bolder citrus flavor. Lemon zest deepens the flavor without adding extra liquid, which makes it an easy way to make the filling taste even more vibrant and fresh.
For a slightly more elegant finish, top the bars with thin lemon zest curls or candied citrus peel instead of only powdered sugar. This makes them look beautiful for parties and special events while keeping the flavor classic.
If you enjoy a more buttery base, you can add a tiny bit more vanilla to the crust or even a touch of lemon zest there too. That gives the whole bar a more rounded lemon flavor from top to bottom.
Serving Ideas
Lemon bars are perfect chilled and served straight from the refrigerator. They’re especially lovely on warm days because the bright citrus flavor feels refreshing and light.
Serve them as part of a dessert tray with cookies, brownies, and mini cupcakes for showers, brunches, or holiday gatherings. Their color and powdered sugar topping make them stand out beautifully.
They also pair well with tea, coffee, or iced drinks. For spring and summer events, they’re especially nice with iced tea, lemonade, or sparkling water with fruit.
If you want a slightly fancier plated dessert, serve a lemon bar with a dollop of whipped cream and a few fresh berries on the side. Strawberries, raspberries, or blueberries all pair wonderfully with lemon.
Because they cut into neat squares, they’re also ideal for potlucks, picnics, and bake sales. They travel well once chilled and feel more polished than many casual bar desserts.
Storage Tips
Store lemon bars covered in the refrigerator for up to 1 week. They stay firm and taste best when chilled.
If stacking them, place parchment between layers so the tops stay neat and the powdered sugar does not smear too much.
For freezing, cut the chilled bars into squares without the powdered sugar topping. Freeze them on a tray for about 1 hour, then wrap individually and store in a freezer-safe container for up to 3 to 4 months.
Thaw in the refrigerator, then dust with confectioners’ sugar just before serving for the freshest look.
FAQs
Why do my lemon bars crack on top?
Small cracks can happen from overbaking. Bake only until the center is set and barely jiggles. The bars will continue to firm up as they cool.
Can I use bottled lemon juice?
You can, but fresh lemon juice gives the best flavor. Since lemon is the main ingredient, fresh juice really improves the final taste.
Why is my filling lumpy?
That usually happens when the flour is not mixed in fully. Sifting the sugar and flour together first helps keep the filling smooth.
Disclaimer
This recipe is provided for general informational purposes. Results may vary based on ingredient brands, pan material, oven temperature accuracy, and measuring methods.

Classic Lemon Bars
Ingredients
Equipment
Method
- Preheat oven to 325°F and line a 9×13-inch glass baking pan with parchment paper.
- Mix melted butter, sugar, vanilla, salt, and flour to make the crust dough.
- Press the crust evenly into the pan and bake for 20 to 22 minutes.
- Poke holes in the warm crust with a fork.
- Sift together sugar and flour for the filling, then whisk in eggs, lemon juice, and zest.
- Pour filling over the warm crust.
- Bake for 22 to 26 minutes until the center is set.
- Cool completely, then chill in the refrigerator for 1 to 2 hours.
- Lift out of the pan, dust with confectioners’ sugar, and cut into squares.
Nutrition
Notes
Tried this recipe?
Let us know how it was!Conclusion
These lemon bars are everything a classic citrus dessert should be: bright, buttery, creamy, tangy, and incredibly satisfying. The shortbread crust is rich and sturdy, the lemon layer is smooth and vibrant, and the final dusting of powdered sugar makes them look as lovely as they taste. Whether you’re baking for a special gathering or simply want a dessert that feels fresh and cheerful, lemon bars are one of those timeless recipes that never stop being a good idea. Once you make a batch and taste that sweet-tart balance, it’s easy to see why they remain such a favorite