Why Make This Recipe
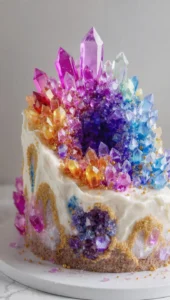
Crystal Candy Geode Cake is not only visually stunning but also delicious. It’s perfect for celebrations, including birthdays or special events. The blend of flavors and textures, along with the eye-catching geode design, makes it a show-stopper that can impress your guests. Making this cake will allow you to express your creativity while enjoying a delightful treat.
How to Make Crystal Candy Geode Cake
Ingredients:
- 1 box cake mix (or homemade cake batter for 3 layers)
- 1 cup butter (for buttercream)
- 4 cups powdered sugar
- 2-3 tbsp milk
- 1 tsp vanilla extract
- Gel food coloring (various colors for geode effect)
- Rock candy (clear or white, and colored)
- Edible gold leaf or gold food paint
- Fondant (white, to cover the cake)
Directions:
- Bake three layers of cake using your preferred cake mix or homemade batter. Let them cool completely.
- Make the buttercream by beating the butter until fluffy. Gradually add the powdered sugar, milk, and vanilla extract.
- Stack and fill the cake layers with the buttercream. Apply a thin crumb coat and chill the cake.
- Cover the cake with a thicker layer of buttercream and chill again until firm.
- Roll out the fondant and cover the cake smoothly. Trim any excess fondant.
- Use a knife to carve out a section of the cake to form the ‘geode’ cavity.
- Apply a thin layer of buttercream inside the carved area to help the crystals stick.
- Arrange rock candy starting from darker shades in the center to lighter shades on the outside to create a realistic geode look.
- Use edible gold leaf or gold paint to outline the geode edges for an enhanced effect.
- Finish decorating the rest of the cake as desired and refrigerate until ready to serve.
How to Serve Crystal Candy Geode Cake
Serve Crystal Candy Geode Cake by slicing it into equal pieces. Place a piece on a plate and enjoy with a glass of milk or your favorite beverage. The vibrant colors and crystal decorations will surely be a hit!
How to Store Crystal Candy Geode Cake
Store any leftover cake in an airtight container in the refrigerator for up to 3-4 days. If the cake is well-covered, it can last longer. Ensure the rock candy remains intact for optimal appearance.
Tips to Make Crystal Candy Geode Cake
- Take your time while decorating to ensure the geode looks beautiful.
- Use a variety of colored rock candies to create a stunning gradient effect.
- Try different flavors for the cake layers, like chocolate or vanilla, to complement the design.
Variation
You can switch up the colors and designs based on the occasion. For example, use pastel colors for a spring-themed party or darker hues for a more dramatic effect.
FAQs
1. Can I use a different type of cake mix?
Yes, you can use any type of cake mix or homemade recipe that you enjoy.
2. How can I make the buttercream dairy-free?
You can substitute the butter with a dairy-free margarine and use a plant-based milk.
3. What if I don’t have rock candy?
If you don’t have rock candy, you can use crushed hard candies for similar effects.
With this guide, you are ready to create a stunning Crystal Candy Geode Cake that will delight everyone! Enjoy baking!

Crystal Candy Geode Cake
Ingredients
Method
- Bake three layers of cake using your preferred cake mix or homemade batter. Let them cool completely.
- Make the buttercream by beating the butter until fluffy. Gradually add the powdered sugar, milk, and vanilla extract.
- Stack and fill the cake layers with the buttercream. Apply a thin crumb coat and chill the cake.
- Cover the cake with a thicker layer of buttercream and chill again until firm.
- Roll out the fondant and cover the cake smoothly. Trim any excess fondant.
- Use a knife to carve out a section of the cake to form the ‘geode’ cavity.
- Apply a thin layer of buttercream inside the carved area to help the crystals stick.
- Arrange rock candy starting from darker shades in the center to lighter shades on the outside to create a realistic geode look.
- Use edible gold leaf or gold paint to outline the geode edges for an enhanced effect.
- Finish decorating the rest of the cake as desired and refrigerate until ready to serve.