Why Make This Recipe
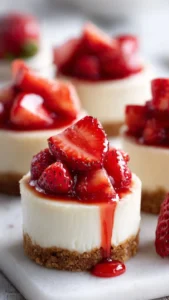
No-bake mini cheesecake cups are perfect for anyone who loves a delicious dessert but doesn’t want to spend hours in the kitchen. These little cups come together in just 15 minutes and are an excellent choice for gatherings, parties, or a sweet treat at home. They are creamy, sweet, and topped with fresh berries, making them irresistible!
How to Make Irresistible No-Bake Mini Cheesecake Cups
Ingredients:
- 1 cup graham cracker crumbs
- 3 tbsp melted butter
- 8 oz cream cheese, softened
- 1/4 cup sugar
- 1 tsp vanilla extract
- 1/2 cup heavy cream
- Fresh berries for topping
Directions:
- Start by mixing the graham cracker crumbs and melted butter in a bowl until well combined.
- Press this mixture into the bottom of small cups or jars to create a crust.
- In another bowl, beat the softened cream cheese, sugar, and vanilla extract together until smooth and creamy.
- In a separate bowl, whip the heavy cream until stiff peaks form.
- Fold the whipped cream into the cream cheese mixture gently until mixed well.
- Spoon the filling over the crust in each cup, filling them generously.
- Chill the cheesecake cups in the refrigerator for at least 2 hours before serving.
- Just before serving, top with fresh berries for a burst of color and flavor.
How to Serve Irresistible No-Bake Mini Cheesecake Cups
These mini cheesecake cups can be served straight from the refrigerator. They are perfect for parties, picnics, or any gathering. You can place them on a dessert table or serve them individually for an even more personal touch. Add a sprig of mint or extra berries on top to make them look extra special!
How to Store Irresistible No-Bake Mini Cheesecake Cups
If you have leftovers, you can keep them in the refrigerator. Place plastic wrap over the cups or transfer them to an airtight container. They will stay fresh for up to three days, but they are best enjoyed within the first couple of days to maintain their creamy texture and flavor.
Tips to Make Irresistible No-Bake Mini Cheesecake Cups
- Make sure your cream cheese is softened before mixing to avoid lumps.
- Use a variety of berries for topping to add different flavors and colors.
- For an even richer taste, consider adding a splash of lemon juice to the cream cheese mixture.
Variation
You can customize these cheesecake cups by adding different flavors. Try mixing in melted chocolate for chocolate cheesecake cups or adding fruit purée to the filling for fruity flavors. You can also swap out the graham cracker crust for an Oreo crust for a fun twist!
FAQs
Can I make these cheesecake cups ahead of time?
Yes, these cheesecake cups can be made a day in advance and stored in the refrigerator.
What can I use instead of heavy cream?
If you want a lighter version, you can substitute the heavy cream with whipped topping.
Can I freeze the cheesecake cups?
While they can be frozen, it’s best to store them in the refrigerator for the best texture. If freezing, allow them to thaw in the fridge before serving.

Irresistible No-Bake Mini Cheesecake Cups
Ingredients
Method
- Mix the graham cracker crumbs and melted butter in a bowl until well combined.
- Press this mixture into the bottom of small cups or jars to create a crust.
- In another bowl, beat the softened cream cheese, sugar, and vanilla extract together until smooth and creamy.
- In a separate bowl, whip the heavy cream until stiff peaks form.
- Fold the whipped cream into the cream cheese mixture gently until mixed well.
- Spoon the filling over the crust in each cup, filling them generously.
- Chill the cheesecake cups in the refrigerator for at least 2 hours before serving.
- Just before serving, top with fresh berries for a burst of color and flavor.