")
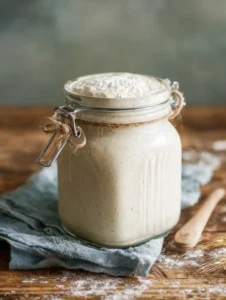
If sourdough feels intimidating, this Beginner Sourdough Starter guide makes it doable no fancy tools, no stress. You’ll build a lively starter with a simple daily routine of flour + warm water, and you’ll learn what’s normal (like the Day 3 “false start”) so you don’t give up too soon. Temperature matters most: keep your jar cozy, and your starter will reward you with bubbles, a pleasant tangy smell, and reliable rise. Once it’s active, you can bake crusty sourdough bread, pancakes, pizza dough, and more. This is an easy sourdough starter for beginners that works even if your kitchen runs cool just be patient and consistent.
table of contents
Time Breakdown
- Prep Time: 5 minutes/day
- Total Time: 7–14+ days (depends on temperature)
- Yield: ~1 cup starter (about 200–250 g)
Ingredients List
- Whole wheat flour (for the first mix)
- All-purpose or bread flour (for ongoing feedings)
- Warm water (around 85°F / 29°C is ideal)
Starter feeding ratio: equal weights flour + water (example: 60g flour + 60g water)
Kitchen Tools You’ll Need
This recipe doesn’t require fancy gadgets, just a few reliable kitchen basics to keep everything simple and stress-free.
- 1 large jar (about ¾ liter / 1 quart)
- Spoon or fork (for mixing)
- Rubber band or tape (to mark rise level)
- Kitchen scale (recommended) or measuring cups
- Small spatula (optional for scraping sides)
Step-by-Step Beginner-Friendly Instructions (7–14 Days)
Before you start (important!)
- Pick a feeding time and stick to it daily (morning is easiest).
- Keep it warm: Aim for 70–75°F (21–24°C). A turned-off oven with the light on works great (check it doesn’t get hot).
- Mark your jar: Use a rubber band at the level of the starter so you can see growth.
Day 1: Start the culture
- Add 60g whole wheat flour + 60g warm water to your jar.
- Mix until thick and smooth (like paste).
- Cover loosely and leave in a warm spot for 24 hours.
✅ Goal: a thick mixture. Bubbles may or may not appear yet.
Day 2: Wait + watch
- Look for bubbles on top or along the sides.
- If you see nothing, it’s still okay—stir once to add oxygen.
- Cover and rest another 24 hours.
Goal: maybe a few bubbles; smell can be floury or slightly tangy.
Day 3: First feeding (discard + feed)
- Discard about half the starter (don’t worry about perfect accuracy).
- Add 60g all-purpose flour + 60g warm water.
- Mix until smooth (like thick pancake batter).
- Cover and rest 24 hours.
⚠️ Note: You might see a burst of activity then a slowdown—normal!
Day 4–7: Repeat daily feedings
Each day:
- Discard half.
- Feed with 60g flour + 60g warm water.
- Mix, mark the level, cover, and rest warm for 24 hours.
What to expect:
- Days 3–4 can look “dead” (this is the common false start)
- By Days 6–10 you should see stronger bubbles and better rise
- Smell should shift from funky to pleasantly tangy
Day 8–14: When is it ready?
Your starter is ready when it:
- Doubles in size within 4–8 hours after a feeding
- Looks bubbly and airy
- Smells pleasantly tangy (not harsh)
Float test (optional): After it doubles, drop a small spoonful into water. If it floats, it’s often ready—but rise + bubbles matter more than the float test.
Pro Tips
- Hooch (dark liquid on top): Your starter is hungry. Pour it off or stir it in, then feed.
- Too cold = slow starter: Move it warmer or extend the timeline (2+ weeks is common).
- Consistency check: Aim for thick batter. If it’s watery, add a touch more flour next feeding.
- Don’t swap measurement systems: Use either a scale OR cups consistently.
Nutrition Table (Estimated)
Because a starter is mostly flour + water and you discard regularly, nutrition varies a lot. Here’s a simple estimate for an “active starter” serving.
| Serving Size | Calories | Protein | Carbs | Fat | Fiber | Sugar |
|---|---|---|---|---|---|---|
| 2 tbsp starter | 30 | 1g | 6g | 0g | 0g | 0g |
Disclaimer: Nutrition facts are estimated using online tools and may vary based on your ingredients and preparation. Please consult a nutritionist for precise dietary advice.
Beginner Sourdough Starter (No-Fuss 7–14 Day Guide)
Equipment
- Large jar (about 3/4 L / 1 quart)
- Spoon or fork
- Rubber band or tape to mark rise
- Kitchen scale (recommended) or measuring cups
Materials
- whole wheat flour for Day 1
- all-purpose flour or bread flour for daily feedings
- warm water about 85°F / 29°C
Instructions
- Pick a feeding time and feed at the same time every day.
- Keep the starter warm (70–75°F / 21–24°C) for best results.
- Mark the starter level on the jar with a rubber band or tape.
- Mix 60 g whole wheat flour + 60 g warm water in a jar until thick and smooth.
- Cover loosely and rest 24 hours in a warm spot.
- Look for bubbles (it’s okay if you don’t see any yet). Stir once if you want.
- Cover and rest another 24 hours.
- Discard about half the starter.
- Feed with 60 g all-purpose flour + 60 g warm water. Mix until smooth like thick batter.
- Cover and rest 24 hours.
- Discard half.
- Feed with 60 g flour + 60 g warm water.
- Mix, mark the level, cover, and rest warm for 24 hours.
- Your starter is ready when it doubles in size within 4–8 hours after feeding and looks bubbly and airy.
- Optional float test: after it doubles, a spoonful may float in water.
Notes
Nutrition
Conclusion
A sourdough starter is all about routine and warmth. Keep your feedings consistent, don’t panic during the Day 3–4 slowdown, and give it time to become strong. Once it’s doubling reliably, you’re ready to bake!