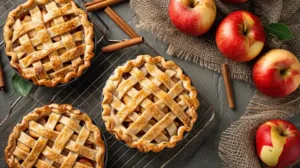
Why This Easy Apple Pie Filling Is Breaking the Internet This October – Ready in Just 20 Minutes!

Want to know why homemade apple pie filling is going viral this fall? Because it takes just 20 minutes to make something that tastes 10x better than store-bought—and you only need 8 ingredients.
This easy apple pie filling recipe is everything: tender apple slices, glossy cinnamon sauce, and that perfect sweet-tart balance. No preservatives, no weird flavor—just the best homemade apple pie filling you’ve ever tasted.
Right now, apple pie filling recipes are trending everywhere. Bakers are ditching canned filling and making their own, and once you try this homemade apple pie filling, you’ll understand why. Use it for apple pie, puff pastry turnovers, pancake topping—literally anything.
Ready to make the best apple pie filling ever? Here’s how. 🍎

tabkle of contants
What Makes This Apple Pie Filling Recipe So Special?
Here’s why you’ll never go back to store-bought apple pie filling again:
✅ Ready in under 20 minutes – Faster than a trip to the grocery store
✅ Just 8 simple ingredients – No fancy equipment or obscure spices
✅ Perfectly tender apples – Never mushy, never crunchy, always just right
✅ Tastes like grandma’s secret recipe – But easier (don’t tell her)
✅ Budget-friendly – Way cheaper than canned apple pie filling
✅ Customizable sweetness – Adjust to your taste
✅ Freezer-friendly – Make now, bake later
✅ So versatile – Use it in pies, tarts, pancakes, ice cream… you name it!
Plus, bonus: Your entire house will smell like a fall festival. 🍂
let’s connect in pinterest
What You’ll Need for the Best Apple Pie Filling
The beauty of this homemade apple pie filling recipe? You probably have most of these ingredients in your kitchen right now. Here’s what you’ll need to make 6 cups of the most incredible apple pie filling:

The Star of the Show:
🍎 3 pounds of apples (6-8 medium apples) – This is where the magic happens. For the best apple pie filling, use Granny Smith apples—they’re tart, firm, and hold their shape beautifully when cooked. But don’t stop there! Mix in some Honeycrisp, Gala, or Pink Lady for extra sweetness and complexity. Whatever you do, avoid Red Delicious or Fuji—they’ll turn your apple pie filling into watery applesauce. Trust me on this.
The Sweet & Tangy Balance:
- ¼ cup granulated sugar – For that classic sweetness
- ½ cup light brown sugar – Adds a gorgeous molasses depth and rich color
- 2 tablespoons fresh lemon juice – Keeps apples from browning AND adds brightness
The Flavor Makers:
- ¼ cup butter (½ stick) – Makes the sauce luxuriously creamy (use coconut oil for vegan/dairy-free)
- 2 teaspoons vanilla extract – Brings out those cozy, toasty notes
- 1½ teaspoons ground cinnamon – The signature fall spice (add nutmeg or allspice if you’re feeling fancy!)
- 1 pinch of salt – Enhances all the flavors
The Secret Weapon:
- 2-3 tablespoons cornstarch + 2 tablespoons water – This creates a glossy, thick sauce that clings to every apple slice. (Pro tip: If you’re canning this filling, use Clear Jel instead for food safety!)
How to Make Apple Pie Filling (Step-by-Step)
This easy apple pie filling is honestly easier than making pancakes. Here’s your game plan:
Step 1: Prep Your Apples (5 minutes)

Peel, core, and slice those apples into thin, even pieces about ¼-inch thick works perfectly. Toss them in a large bowl with the granulated sugar and lemon juice. This does two magical things: prevents browning and draws out moisture for a better sauce. Set aside while you tackle the next step.
💡 Pro tip: Use an apple peeler/corer if you have one it’ll cut your prep time in half!
Step 2: Make the Sauce Base (3 minutes)

In a large pan over medium heat, melt together the butter, brown sugar, vanilla extract, cinnamon, salt, and ¼ cup water. Stir occasionally until everything melts into a smooth, fragrant mixture. Your kitchen is already starting to smell amazing, isn’t it? 🤤
Step 3: Cook the Apples (4-6 minutes)

Add your prepared apple slices (and any liquid from the bowl) to the pan. Stir until every slice is coated in that beautiful cinnamon sauce. Cover the pan and let the apples cook, stirring occasionally, for 4-6 minutes. You want them slightly softened but still holding their shape not mushy!
🔥 Important: Keep the heat at medium. Too high and the sauce will burn; too low and the apples won’t cook properly.
Step 4: Thicken the Magic (2 minutes)
In a small bowl, whisk together cornstarch and 2 tablespoons of water to form a smooth slurry. Pour it slowly into the warm apple pie filling, stirring constantly to avoid lumps. As the mixture heats, keep it moving—within a minute, the apple pie filling thickens into a glossy, rich sauce that coats each apple slice beautifully. This simple step transforms your apple pie filling into that thick, bakery-style consistency everyone loves and ensures it holds up perfectly in pies, tarts, and other fall desserts.
his is when you know you’ve nailed it.
Step 5: Cool & Enjoy

Remove from heat and let it cool slightly before using. That’s it! You just made the best homemade apple pie filling in under 20 minutes. 🎉
Expert Tips for Perfect Apple Pie Filling Every Time
Want to go from good to “holy cow, did you make this apple pie filling from scratch?!” Here’s what the pros know:
✅ Use firm, slightly tart apples – Granny Smith is the gold standard for homemade apple pie filling
✅ Slice evenly – Uniform slices = even cooking (no crunchy or mushy surprises)
✅ Don’t skip the lemon juice – It’s not just for color—it balances the sweetness
✅ Stir regularly – Every stove heats differently; keep an eye on things
✅ Don’t overcook – Remember, if you’re using this in a pie, the apples will cook more in the oven
✅ Taste as you go – Adjust sweetness or spice to your preference
✅ Add a splash of water if needed – If the filling starts sticking to the pan, thin it out slightly
💡 Game-changer tip: Make a double batch of this easy apple pie filling and freeze half. Future you will be so grateful when you need a last-minute dessert!
Common Mistakes to Avoid (So Your Apple Pie Filling Turns Out Perfect)
Even experienced bakers make these mistakes with homemade apple pie filling. Here’s how to dodge them:
❌ Using the wrong apples – Soft, watery varieties = soggy disaster
❌ Overripe apples – They’ll turn to mush and taste too sweet
❌ Uneven slicing – Some pieces overcooked, others underdone
❌ Skipping the lemon juice – Brown apples aren’t appetizing
❌ Forgetting the thickener – You’ll end up with apple soup
❌ Overcooking – Applesauce is great, but not when you wanted pie filling
❌ Too much sugar – Apples are already naturally sweet!
Ways to Use This Apple Pie Filling (Beyond Just Pie!)

This is where things get really fun with your homemade apple pie filling. Sure, you can make a classic apple pie—but why stop there?
🥧 Classic desserts:
- Traditional apple pie or hand pies
- Apple turnovers or puff pastry rolls
- Apple crumble or crisp topping
- Stuffed baked apples
🥞 Breakfast heroes:
- Swirled into oatmeal or overnight oats
- Piled on pancakes or waffles
- Mixed into yogurt parfaits
- As a filling for crepes
🍨 Easy treats:
- Spooned over vanilla ice cream
- Layered in parfait glasses with whipped cream
- Stirred into cake batter
- Straight from the jar (no judgment!)
🎉 Party showstoppers:
- Apple cheese ball coating
- Phyllo cups filling
- Streusel muffin centers
- Cheesecake topping
The possibilities are literally endless with this versatile apple pie filling recipe!
conclusion
Once you make this homemade apple pie filling, you’ll never go back to the canned version. It’s quick, easy, and packed with real flavor. This apple pie filling is perfect for pies, crisps, pastries, or served warm over pancakes and ice cream. Made with peak-season apples and just a few pantry staples, it’s everything a fall recipe should be. It’s no surprise this apple pie filling is trending right now. Make it once, and it’ll become your go-to for every cozy dessert all season long.
Frequently Asked Questions About Apple Pie Filling
What are the best apples for apple pie filling?
Granny Smith apples are the MVP for homemade apple pie filling—they’re tart, firm, and available year-round. They hold their shape perfectly and won’t turn mushy. For a more complex flavor, mix them with sweeter varieties like Honeycrisp (sweet and crisp), Gala (mellow and reliable), or Pink Lady (beautifully balanced tartness).
Do I need to cook the apples before putting them in a pie?
Yes! Pre-cooking is a game-changer for the best apple pie filling for two reasons:
It draws out excess moisture, preventing a soggy crust
It creates that delicious, glossy sauce that coats the apples
Plus, you avoid that dreaded gap between the crust and filling when the apples shrink during baking.
Can I use this filling in a store-bought pie crust?
Absolutely! This easy apple pie filling works perfectly with store-bought crusts. Just pour it into your prepared crust and bake at 375°F (190°C) for 45-55 minutes until the crust is golden and the filling bubbles. Cover the edges with foil if they brown too quickly.
What’s the best thickener for apple pie filling?
Cornstarch is the winner for most home bakers making homemade apple pie filling—it creates a clear, glossy sauce without a starchy taste. You can also use all-purpose flour (use 1.5x the amount of cornstarch), but it won’t be as clear.
Important for canning: Use Clear Jel (cook-type) instead of cornstarch or flour for safe room-temperature storage. Cornstarch can prevent proper heat penetration during canning.
Storage, Freezing & Make-Ahead Tips for Apple Pie Filling

One of the best things about this homemade apple pie filling recipe? You can make it way ahead of time and store it for whenever the pie craving hits (or when unexpected guests show up!).
Best Homemade Apple Pie Filling
Ingredients
Equipment
Method
- Peel, core, and thinly slice apples. Toss with granulated sugar and lemon juice in a large bowl. Set aside.
- In a large pan over medium heat, melt butter, brown sugar, vanilla, cinnamon, salt, and ¼ cup water. Stir until smooth.
- Add apples and any juice from the bowl. Cover and cook for 4–6 minutes, stirring occasionally, until slightly softened.
- Mix cornstarch with 2 tbsp water to make slurry. Stir into the apples and bring to a light boil. Cook 1 minute until thickened and glossy.
- Remove from heat. Let cool slightly before using or storing.
Nutrition
Notes
Tried this recipe?
Let us know how it was!for more recipe follow this recipe https://benizzrecipes.com/white-lasagna-soup/