why make this recipe
No Bake Mini Cheesecake Cups are a delightful treat that combines creamy bliss with simplicity. They are perfect for any occasion—whether you’re hosting a party or just want a quick dessert. The best part is that they require no baking, making them a stress-free option. These mini cheesecakes are easy to customize, so you can add your favorite toppings. Plus, they are perfectly portable, allowing you to enjoy dessert anywhere.
how to make No Bake Mini Cheesecake Cups
Ingredients:
For the crust:
- 1 1/2 cups (150 g) graham cracker crumbs (or digestive biscuit crumbs)
- 2 tablespoons granulated sugar
- 5 tablespoons unsalted butter, melted
- Pinch of fine salt
For the filling:
- 16 ounces (450 g) full-fat cream cheese, softened to room temperature
- 1/2 cup (100 g) granulated sugar
- 2 teaspoons pure vanilla extract
- 1 tablespoon fresh lemon juice
- 1 cup (240 ml) cold heavy whipping cream
- 1/3 cup (40 g) powdered sugar
For topping (choose your favorites):
- Fresh berries, sliced stone fruit, or citrus segments
- Fruit compote or jam
- Chocolate shavings or mini chocolate chips
- Salted caramel or chocolate sauce
- Lemon curd
Equipment:
- 12-cup muffin pan
- Paper or foil cupcake liners
- Mixing bowls
- Hand mixer or stand mixer
Directions:
- Line your pan: Place cupcake liners in a standard 12-cup muffin pan. This keeps the crust tidy and makes unmolding easy.
- Make the crust: In a bowl, combine graham cracker crumbs, sugar, melted butter, and a pinch of salt. Stir until the texture looks like damp sand and holds when pressed.
- Press it in: Divide the crumb mixture evenly across the liners. Press firmly with the bottom of a small glass or spoon to create a tight, even base. A firm pack helps slices hold together.
- Chill the crusts: Place the pan in the fridge while you make the filling. Ten minutes is enough to set the butter and keep crumbs in place.
- Whip the cream: In a cold bowl, beat heavy cream with powdered sugar to medium-stiff peaks. Set aside. Whipping separately keeps the filling light.
- Beat the cream cheese: In another bowl, beat softened cream cheese until completely smooth and no lumps remain. Add granulated sugar, vanilla, and lemon juice. Beat until glossy and creamy.
- Fold gently: Using a spatula, fold the whipped cream into the cream cheese mixture in two or three additions. Keep strokes gentle to avoid deflating the cream.
- Fill the cups: Spoon or pipe the filling onto the chilled crusts, smoothing the tops. Fill each cup nearly to the top for a generous portion.
- Chill to set: Refrigerate for at least 3 hours, or until the centers feel firm and hold their shape. Overnight chilling gives the cleanest texture.
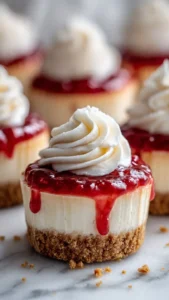
- Add toppings: Right before serving, top with fresh fruit, sauces, or chocolate. Keep it light so the cheesecake remains the star.
- Unmold and enjoy: Lift each cheesecake out of the pan by the liner. Peel away the liner for clean edges or serve as-is for easy handling.
how to serve No Bake Mini Cheesecake Cups
Serve No Bake Mini Cheesecake Cups chilled. You can place them on a platter for a party or give them individually to guests. They are great for any gathering, and the easy-to-hold cupcake liners make them perfect for outdoor picnics or potlucks.
how to store No Bake Mini Cheesecake Cups
You can store the mini cheesecake cups in the refrigerator for up to 4 days. Cover them well so they don’t absorb any unwanted smells or flavors. If you’ve added toppings, it’s best to store the toppings separately until you are ready to serve.
tips to make No Bake Mini Cheesecake Cups
- Make sure the cream cheese is at room temperature for easy mixing.
- Don’t skip chilling the crust; it helps everything stay together.
- Use a mixer to beat the cream cheese for a smooth filling.
- Experiment with different toppings such as nuts, sprinkles, or flavored syrups.
- For a gluten-free option, choose gluten-free graham crackers or cookies for the crust.
variation
For a chocolate version, you can mix cocoa powder into the cream cheese filling. Alternatively, you can swirl in some melted chocolate or use chocolate cookies for the crust.
FAQs
Can I use low-fat cream cheese? Yes, you can use low-fat cream cheese, but the texture may be slightly different. Full-fat cream cheese gives a creamier and richer taste.
How can I make these mini cheesecakes dairy-free? You could use dairy-free cream cheese and coconut cream as a substitute for heavy cream.
Can I freeze No Bake Mini Cheesecake Cups? Yes, you can freeze them, but it’s best to leave off toppings and add those just before serving after thawing in the fridge.

No Bake Mini Cheesecake Cups
Ingredients
Method
- Line your pan: Place cupcake liners in a standard 12-cup muffin pan.
- Make the crust: In a bowl, combine graham cracker crumbs, sugar, melted butter, and a pinch of salt. Stir until the texture looks like damp sand.
- Press it in: Divide the crumb mixture evenly across the liners and press firmly to create a tight, even base.
- Chill the crusts: Place the pan in the fridge for 10 minutes.
- Whip the cream: In a cold bowl, beat heavy cream with powdered sugar to medium-stiff peaks and set aside.
- Beat the cream cheese: In another bowl, beat softened cream cheese until smooth. Add sugar, vanilla, and lemon juice and beat until glossy.
- Fold gently: Fold the whipped cream into the cream cheese mixture in two or three additions.
- Fill the cups: Spoon or pipe the filling onto the chilled crusts.
- Chill to set: Refrigerate for at least 3 hours until the centers feel firm.
- Add toppings: Top with fresh fruit or sauces before serving.
- Unmold and enjoy: Lift each cheesecake out of the pan by the liner.