
Crispy, Creamy, Sweet Dessert Dream

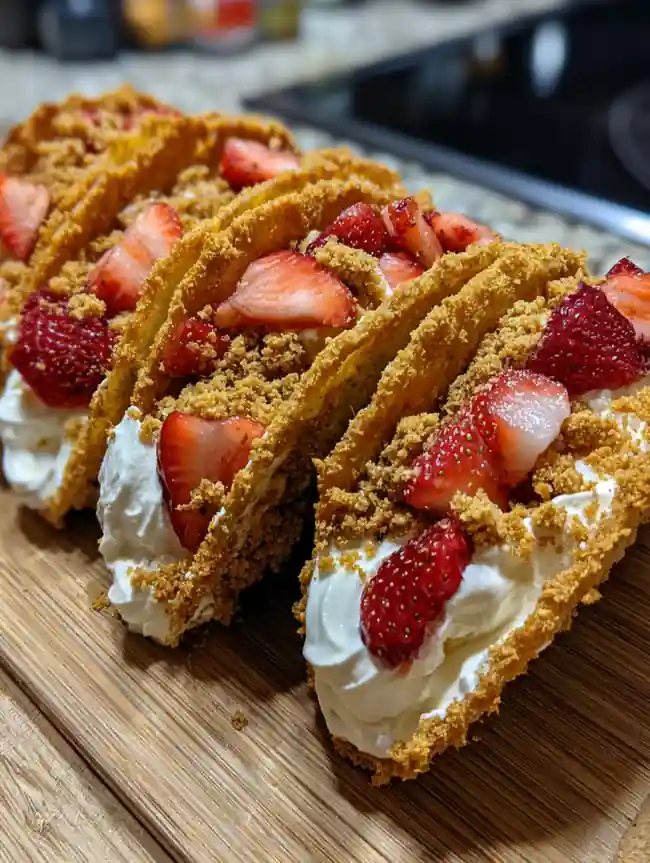
If you love fun desserts that look as amazing as they taste, these Strawberry Crunch Cheesecake Tacos are about to become your new favorite treat. Crispy baked tortilla shells are coated in silky white chocolate and strawberry crunch crumbs, then filled with fluffy no-bake cheesecake and topped with fresh strawberries and sweet strawberry syrup. They’re perfect for birthdays, Valentine’s Day, summer parties, or whenever you want a show-stopping dessert that’s surprisingly easy to make. Best of all? They can be prepped ahead, making them ideal for busy hosts who still want that Pinterest-perfect finish.
table of contents
Time Breakdown
- Prep Time: 50 minutes
- Cook Time: 6 minutes
- Total Time: 56 minutes
- Servings: 15 tacos
Ingredients List
TACO SHELLS:
- 5 large flour tortillas
- 1 tablespoon unsalted butter, melted
- 13 ounces high-quality white chocolate, chopped
- 1 ½ cups strawberry crunch crumbs
CHEESECAKE FILLING:
- 8 oz cream cheese, softened
- ½ cup powdered sugar
- 1 teaspoon vanilla extract
- 1 cup heavy whipping cream (cold)
TOPPING:
- ⅔ cup strawberry syrup
- 2 cups fresh strawberries, diced or halved
Kitchen Tools You’ll Need
This recipe doesn’t require fancy gadgets, just a few reliable kitchen basics to keep everything simple and stress-free.
- 4-inch round cookie cutter
- Muffin tin (standard size)
- Baking sheet
- Parchment paper
- Mixing bowls
- Hand mixer or stand mixer
- Double boiler or microwave-safe bowl
- Spatula
- Pastry brush
- Piping bag
Step-by-Step Beginner-Friendly Instructions
Shape & Bake the Shells
- Preheat oven to 350°F (175°C).
- Cut tortillas into 15 circles using a 4-inch cutter.
- Lightly brush both sides with melted butter.
- Flip a muffin tin upside down and gently fold each tortilla circle between muffin cups to create a taco shape.
- Bake for 5–6 minutes, until edges are golden.
- Let cool 1 minute in the pan, then transfer to a parchment-lined sheet to cool completely.
💡 Tip: Lightly poke tortillas with a knife before baking to prevent bubbles.
Melt the White Chocolate
Double Boiler Method:
- Heat 1 inch of water in a saucepan.
- Place chopped chocolate in a heatproof bowl over the pan (do not touch water).
- Stir constantly until smooth and glossy.
Microwave Method:
- Heat in 20-second intervals, stirring between each, until fully melted.
- Be careful — white chocolate burns easily!
Coat the Shells
- Brush melted chocolate inside and outside each cooled shell.
- Immediately coat in strawberry crunch crumbs.
- Place back on parchment paper.
- Let chocolate set completely before filling.
✨ Shell should feel firm and fully hardened before moving on.
Make the Cheesecake Filling
- Beat softened cream cheese, powdered sugar, and vanilla until smooth.
- In a separate bowl, whip cold heavy cream until stiff peaks form.
- Gently fold whipped cream into cream cheese mixture until fluffy.
- Do not overmix.
Transfer to a piping bag.
Assemble the Tacos 🌸
- Stand shells upright in an inverted muffin tin or baking dish.
- Pipe cheesecake filling evenly into each shell.
- Top with diced strawberries.
- Drizzle with strawberry syrup.
Serve immediately or chill until ready to enjoy!
Pro Tips
- Storage: Store in an airtight container in the fridge up to 3 days.
- Make Ahead: Prepare shells and filling 1 day ahead. Add toppings before serving.
- Chocolate Quality: Use premium white chocolate for smoother coating.
- Prevent Cracking: Don’t overbake shells — they’ll crack during coating.
Nutrition Table
| Serving Size | Calories | Protein | Carbs | Fat | Fiber | Sugar |
|---|---|---|---|---|---|---|
| 1 taco | 392 | 5g | 43g | 23g | 1g | 32g |
Disclaimer: Nutrition facts are estimated using online tools and may vary based on your ingredients and preparation. Please consult a nutritionist for precise dietary advice.
Strawberry Crunch Cheesecake Tacos
Ingredients
Equipment
Method
- Cut tortillas into 15 equal circles using a round cutter.
- Brush each circle lightly with melted butter and drape over an inverted muffin tin to form taco shells.
- Bake at 350°F (175°C) for 5–6 minutes until lightly golden. Cool completely.
- Melt white chocolate until smooth, then coat the inside and outside of each shell. Immediately press into strawberry crunch crumbs and let set.
- Beat cream cheese, powdered sugar, and vanilla until smooth. In a separate bowl, whip heavy cream to stiff peaks and fold into the cream cheese mixture.
- Pipe the filling into prepared shells and top with fresh strawberries and strawberry syrup before serving.
Nutrition
Notes
Tried this recipe?
Let us know how it was!Conclusion
These Strawberry Crunch Cheesecake Tacos are the perfect balance of crunchy, creamy, and fruity sweetness. They’re easy enough for beginner bakers yet impressive enough for celebrations. Whether you’re hosting a party or simply craving a creative dessert, this recipe delivers flavor, texture, and visual wow-factor in every bite.