introduction
Oreo No-Bake Cheesecake Cups are a delightful treat that brings your favorite cookie into a creamy dessert form. These cups are perfect for gatherings or as a special dessert at home. With minimal effort and no baking required, you can enjoy a deliciously light and fluffy cheesecake with a crunchy Oreo base.
why make this recipe
Making Oreo No-Bake Cheesecake Cups is an excellent choice for anyone looking for a simple yet indulgent dessert. They require no baking, making them easy to whip up even on busy days. Plus, they are great for sharing with friends and family. The combination of Oreo cookies and cheesecake is a crowd-pleaser that everyone loves, and these individual cups make serving a breeze!
how to make Oreo No-Bake Cheesecake Cups
Ingredients:
- 1 8 oz block of cream cheese, softened
- 1 8 oz. Cool Whip or whipped topping
- 2/3 c powdered sugar
- 1 tsp vanilla
- 24-26 Oreo cookies (more as desired)
Directions:
- Prepare the Oreos: Place the Oreos in a plastic bag and seal it. Use a rolling pin or a sturdy wooden spoon to crush the Oreos into small pieces.
- Set the base: Spoon 1 1/2 – 2 tablespoons of the crushed Oreos into the bottom of 6 small dessert dishes. Make sure your dishes hold at least 3/4 cup to 1 cup. Set aside.
- Make the cheesecake filling: In a mixing bowl, use a hand or standing mixer to whip together the cream cheese and powdered sugar until the mixture is creamy and smooth. Add the vanilla and mix again until combined.
- Fold in the Cool Whip: Gently fold in the Cool Whip until fully incorporated, followed by the remaining crushed Oreos.
- Fill the cups: Divide the cheesecake filling evenly among the dishes, gently pressing it onto the crushed Oreos.
- Chill: Refrigerate for about 1 hour or until you’re ready to serve.
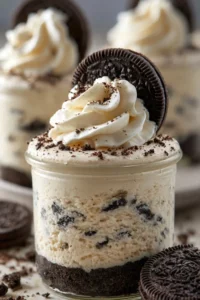
- Serve: Top with whipped cream and extra crushed Oreos before serving. Enjoy!
how to serve Oreo No-Bake Cheesecake Cups
These cheesecake cups are best served chilled. Once you’ve prepared them, simply bring them out of the fridge and add a dollop of whipped cream and a sprinkle of crushed Oreos on top. You can also serve them with fresh fruit or chocolate sauce for an extra treat!
how to store Oreo No-Bake Cheesecake Cups
To store any leftovers, cover the dessert cups with plastic wrap or a tight lid. Keep them in the fridge for up to 3 days. If you need to store them for longer, you can also freeze the cheesecake filling before adding the toppings. Just remember to let them thaw in the fridge before serving.
tips to make Oreo No-Bake Cheesecake Cups
- Make sure the cream cheese is softened properly to avoid lumps in your cheesecake filling.
- You can adjust the sweetness by adding more or less powdered sugar based on your taste preference.
- Feel free to play with the toppings! Try adding chocolate syrup, caramel, or fresh fruit for different flavors.
variation
For a different twist, you can use peanut butter or Nutella mixed into the cheesecake filling. This gives a fun and rich flavor that pairs beautifully with Oreo cookies. You can also try using different flavored Oreos, like mint or peanut butter, for a unique taste.
FAQs
- Can I use low-fat cream cheese or Cool Whip?
- Yes, you can use low-fat versions of cream cheese and Cool Whip. However, the texture and taste might differ slightly.
- Can I make these ahead of time?
- Absolutely! These cheesecake cups can be made a day in advance, making them perfect for parties.
- What can I use instead of Oreos?
- You can substitute Oreos with any other sandwich cookies you like, just keep in mind that the flavor will change based on your choice.

Oreo No-Bake Cheesecake Cups
Ingredients
Method
- Place the Oreos in a plastic bag and crush them into small pieces using a rolling pin or sturdy wooden spoon.
- Spoon 1 1/2 – 2 tablespoons of the crushed Oreos into the bottom of 6 small dessert dishes.
- In a mixing bowl, whip together the cream cheese and powdered sugar until creamy and smooth. Add the vanilla and mix until combined.
- Gently fold in the Cool Whip until fully incorporated, followed by the remaining crushed Oreos.
- Divide the cheesecake filling evenly among the dishes, gently pressing it onto the crushed Oreos.
- Refrigerate for about 1 hour or until ready to serve.
- Top with whipped cream and extra crushed Oreos before serving.